All Minn Kota trolling motors with i-Pilot and i-Pilot Link include wireless remotes paired directly from the factory. However, in the unlikely event that the remote was not paired properly at the factory or loses its power supply for an extended period of time, you may need to pair it manually.
You will also need to complete the pairing process if you purchase an additional or replacement i-Pilot remote, i-Pilot Link remote or an i-Pilot Micro remote. Each motor (Bluetooth equipped motors only) can pair up to 3 separate remotes; so you can have a spare one for emergencies or use a combination of a Full Size i-Pilot remote and Micro Remote.
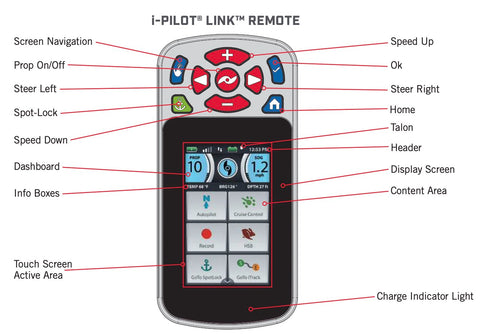
We’ve included product images and instructions below on how to manually pair all i-Pilot Remotes for motors equipped with Bluetooth (produced 2017 and later).
How to Pair a Minn Kota i-Pilot Remote For PowerDrive, Terrova, Ulterra, Riptide PowerDrive, Riptide Terrova, Riptide Ulterra and Ultrex Trolling motors manufactured after 2017 (with Bluetooth).
To Manually Pair a Minn Kota i-Pilot Remote With Your Trolling Motor, Follow These Steps:
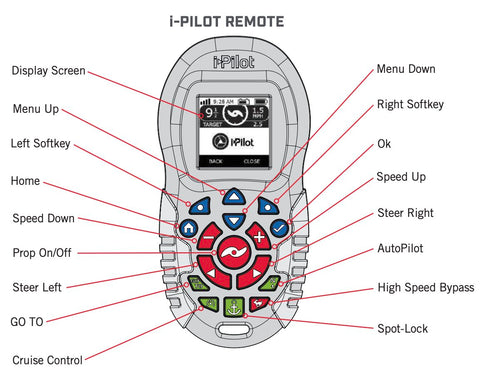
- Turn on the i-Pilot remote by pressing and holding the “Home” button until the screen lights up.
- Use the menu (up/down) buttons to the “System Menu” and select it using the “OK” (check mark) button.
- Scroll through the menu until you find the “Pair” option but do not select it just quite yet.
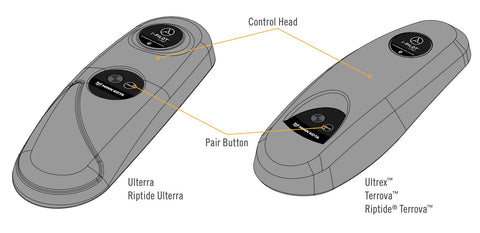
- Locate the “Pair Button” on the top of the motor’s control head.
- Press and hold the pair button on the top of the Control Head until you hear a long “beeeeep”
- Now you can select the “Pair” option on your remote on the menu screen. This will begin the scanning process to complete the pairing.
- Listen for 3 long beeps coming from the Control Head of the motor. Once you hear those beeps, that’s it, you’re paired!
- Confirm successful pairing using the remote to operate the motor and ensure that it is working properly.
NOTE: If unsuccessful, repeat the process from the beginning making sure you follow the steps exactly.
How To Pair a Minn Kota i-Pilot Link Remote With a Trolling Motor Equipped with i-Pilot Link (for models manufactured after 2017 with Bluetooth)

To Manually Pair a Minn Kota i-Pilot Link Remote With Your Trolling Motor, Follow These Steps:
- Turn on the i-Pilot Link remote by pressing and holding the “Home” button until the color touch screen lights up.
- Scroll through the menu on the touchscreen using your finger (or you can use the screen navigation button) until you find the “System Menu” icon which looks like a gear wheel.
- Select the System Menu Icon by either tapping with your finger or by using the “OK” button.
- Scroll through the System Menu until you locate the “Pairing” option – but don’t select it yet!
- Before selecting the Pairing option on your remote, go to the Control Head of the motor and press the “Pair” button, keeping it pressed until you hear a tone coming from the motor.
- On the remote, you can now select that “Pairing” icon. This will begin the scanning process as the motor and remote attempt to pair up.
- If paired successfully, you’ll hear 3 long beeps from the motor’s control head which indicates the pairing process has been successful.
- Confirm successful pairing using the remote to operate the motor and ensure that it is working properly.
How to Pair A Minn Kota i-Pilot Micro Remote To a Bluetooth Equipped Motor (Production Date of 2017 or Later)

To Manually Pair a Minn Kota i-Pilot Micro Remote With Your Trolling Motor Follow These Steps:
- Power Up your trolling motor equipped with either i-Pilot or i-Pilot Link
- Push and hold the “Pair” button on the Control Head at the top of the motor. You should hear a steady tone as you are holding down the button…keep holding that button!
- While holding the pair button on the control head, press and hold the High Speed Bypass button (aka “Rabbit button”) and the AutoPilot button (N with an arrow) for roughly 3 seconds. This takes some dexterity.
- You should hear 3 beeps coming from the motor’s control head which will confirm that your Micro remote has been successfully paired!
- Confirm successful pairing using the remote to operate the motor and ensure that it is working properly.
i-Pilot pairing, i-Pilot Link pairing, Minn Kota remote setup, pair Minn Kota remote, i-Pilot troubleshooting, i-Pilot remote not connecting, Minn Kota GPS pairing, i-Pilot Link manual pair, trolling motor remote setup, Minn Kota Terrova pairing, Ulterra remote pairing, Ultrex remote pairing, replace i-Pilot remote, Minn Kota Bluetooth remote, how to sync i-Pilot remote.